Cart is empty


Vilka arkitektoniska egenskaper bör ett vackert hus ha?

När man bygger ett hus både åt sig själv och sina nära och kära, tänker man också på att tillfredsställa sina estetiska behov. Husarkitektur är ju även byggnadens kännetecken, som påverkar dess materiella värde, vilket blir mycket mätbart under husets försäljning. Vilka arkitektoniska egenskaper ska byggnaden ha för att den kan bedömas som elegant och prestigefylld?
Huset tillfredsställer inte bara våra bostadsbehov, utan är också vårt familjevisitkort. Därför försöker man ge det den mest representativa karaktären. Husarkitektur, byggnadsform, fasad och dess omgivning spelar en viktig roll när man skapar sig en bild av sitt eget hem. De skapar det första intrycket, som är känt för att vara mycket viktigt och vilket förblir för evigt.
Stilbestämmare
Oavsett om man är förtjust i moderna byggnader eller om man föredrar traditionella lösningar, bör man komma ihåg att huset borde vara stilistiskt konsekvent. Det kopplas till vissa regler som härstammar från arkitektoniska antaganden för en viss stil. Det är symmetriprincip som är typisk för landsbygds-, förorts- och herrgårdsstil. Både hus som ligger nära traditionell herrgårdsarkitektur och de husen som återspeglar en modern syn på byggande använder specifika mönster samt element och detaljer som är karakteristiska för en given stil. Det är många viktiga saker att tänka på, dvs form av taklutning, takvinkel, sockelhöjd, form och storlek på fönster samt andra inglasningar och närvaro i byggnadsform. Formen och platsen på risaliter, karmfönster och takkupor på fasaden spelar också en viktig roll. Naturligtvis kan man variera deras plats på fasaden. Konsekvensen av detta är eklektiska förorts- och stadsvillor samt palats. Men för det mesta är sådana projekt skrämmande och de vanställer det arkitektoniska landskapet.
Symmetrisk balans
Symmetriprincipen spelar en viktig roll när man skapar en förebild av huset. Principen är särskilt viktig när byggnadens arkitektur baseras på traditionella lösningar. Inträdesområde, dvs entrétrappa och ytterdörr planeras på symmetriaxel. Takkupor eller vindskupa utformas ofta över inträdesområdet. Ibland placeras ytterdörren också på verandan eller risaliten som är belägna på symmetriaxeln. Planering av fönster och andra detaljer som kolonner och pelare är underordnad inträdesområdets symmetri. Följaktligen bör sidofasader vara sammansatta i enlighet med symmetriprincipen där symmetriaxeln vanligtvis skapar väggtoppen och trädgårdsdelen med terrass finns ofta i form av en veranda eller en balkong. Inglasningar är också karakteristiska för arkitektur som respekterar symmetri. I denna typ av byggnader är fönsterstorlek på fasaden densamma oavsett rumsfunktion. Byggandet av moderna hus inspirerade av herrgårdsarkitektur förknippas med behovet av att anpassa symmetriprincip till verkligheten där på grund av mycket mindre tomter i byggnads konstruktion finns det också ett garage. För att upprätthålla symmetri balanseras garageporten av till exempel ett utökat inträdesområde med dubbelbladiga dörrar, där en entrétrappa och en omfattande plattform finns.
Dags för asymmetri
Om byggnadens arkitektur inspireras av moderna lösningar, som härstammar från modernismen, ger symmetriprincipen plats för asymmetri. Dess dominans förknippas med modernisternas huvudantaganden som beskrivs i deras manifest, där lösningsfunktionaliteten, som innehåller byggnadens form, inklusive fasader, kommer till förgrunden. Resultatet av sådant tänkande om arkitektur är brist på äldre och traditionsförankrade typiska symmetrilösningar. Beroende på funktionen har fönstren olika storlekar och former, och deras höjd på fasaden beror på dimensioner och rumsfunktion. Ytterdörrens position förändras också. Den flyttas ofta från den centrala platsen på den främre fasaden till sidoväggen, som tar över funktionen för inträdesområdet. Naturligtvis betyder det inte att det bör vara kaos på fasaden. Ordningen upprätthålls till exempel av elementplacering i en viss höjd, rätta proportioner av inglasning eller ytterdörr i förhållande till varandra. Användningen av detaljer som burspråk, risaliter, kolumner och gesimser underordnas alltid byggnadens form.
Tak och konstruktion – prestige för enkla former
Höfttak dominerar arkitekturen som förankras i traditionella lösningar. De höfttaken täcker vanligtvis enkla huskonstruktioner, som associeras med polska herrgården, eller med förorts- eller schweizervillan, känd i Polen som świdermajer-stilen. Gaveltak och höfttak i olika varianter, typiska för herrgårdar eller lantliga hus, är en tradition som är värd att fortsätta. Just gaveltak som främjas av energieffektiv och passiv byggande entusiaster har ännu fler anhängare. Gaveltakens enkla form innebär tidlösa och universella fasadlösningar, som nu för tiden kan ses som prestigefyllda – speciellt om man använder ordentligt hållbara och effektiva takbeläggningen och effektiva fasadmaterial. Bland många anses hus med omfattande konstruktion som täcks av taket med flera sluttningar vara prestigefyllt. Emellertid kommer ett sådant utförande, på grund av många brutna taksluttningar – om man vill få ett bra resultat, kommer det att bli mycket dyrt. Hus med ett pulpettak eller ett platt tak får allt mer erkännande. De har inget att göra med en kommunisttidstypisk taksten. Deras prestige byggs av en ren form som är ett resultat av modernistiska traditioner och detaljuppmärksamhet. Dessa hus är förfinade både när det gäller användning av arkitektoniska medel och fasadmaterial. De kännetecknas av mycket hög kvalitet och perfekt utförande.
Fasadmaterial – effekt förstärkning är nödvändig
Byggnadens skönhet kan säkert betonas av ordentligt utförandet av ytterväggar och takbeläggning. Den är som en välgjord sminkning som kan få fram kvinnans bästa fördelar och dölja eventuella brister. Ibland räcker ett perfekt uppsatt gips och en välvald fasadfärg. Material av naturligt ursprung fungerar alltid bra. Husets prestige byggs av släta väggar, och även deras fragment i form av väggsten eller klinker på väggen, och till och med taket täckt med keramiska plattor, skiffer eller spån. Väggar gjorda av exotiskt trä, lärkträ eller fanerade paneler kan också ses som prestigefyllda. Deras position har byggts i århundraden och till och med årtusenden. Man vet hur de åldras och genom att observera även åldriga och lite tidsslitna fasader av dessa material kan man se hur vackert de åldras. Förutom material med naturligt ursprung får produkter som är resultat av modern teknik mer och mer erkännande – stora inglasningar, titanzinkplåt och cementplattor som imiterar stenplattor.
Proportioner – attribut som man inte kan ignorera
För att ett hus ska betraktas som vackert måste det, oavsett stil, bibehålla rätt elementproportioner i förhållande till varandra. Fasadväggar, takytor, inglasningar, takkupor, risaliter, burspråk och andra element bör skapa en proportionell och sammanhängande komposition. När man skapar den kompositionen spelar förhållandet mellan byggnadens höjd och dess bredd en viktig roll – ju mindre husgrunden är desto lägre ska huset vara. Annars hotas det av den så kallade torneffekten. Därför får man inte korrigera arkitektoniska projekt på egen hand, till exempel genom att godtyckligt höja höjden på snedväggen. Om proportionerna störs kan de optiskt förbättras när man sänker fasaden genom att höja sockeln eller använda gesimser. Lika viktiga är korrekta proportionerna av lutande tak i förhållande till väggar. Lutningshöjd och vinkel beror till stor del på husets stil. I det fallet kan husets proportioner förbättras genom att ändra graden på utskjutande takfoten.
Kan energieffektivt hus byggas med populära material?

Ett energieffektivt hus kännetecknas av ett lågt behov av energiförbrukning under sin drifttid. För att uppnå det krävs inte bara rätt design.
Byggandet av ett energieffektivt hus, dvs ett hus som inte kommer att använda mer än 70 kWh/(m2.år) för att värma upp inomhus, värma vatten och strömförsörja elektriska apparater, måste utföras i enlighet med ett antal riktlinjer. Genomförandet av projektet som slutförs i enlighet med gällande krav kräver nödvändighet av ett lämpligt och professionellt byggarbete. Både arkitektonisk design, installationsprojekt och själva byggprocessen måste ta hänsyn till de antagandena som är förknippade med att uppfylla energisparande byggnormer. Behöver man specialmaterial för att uppnå denna standard?
Material och utförande
För att bygga ett energieffektivt hus kan man investera i de senaste byggmaterialen, vars uppgift är först och främst att skydda ytterväggar från överkylning av inomhusmiljö och värmeutsläpp. Isoleringsmetoder som ständigt förbättras visar ännu bättre egenskaper. Dock kan materialen som används för att bygga standardbostäder också fungera bra när det gäller byggande av energieffektiva byggnader. Kunskap om de tekniska parametrarna för mur- och isoleringselement möjliggör att bygga ett hus som uppfyller energieffektivitetskrav. Professionell utförande är dock en oerhört viktig faktor. Även högkvalitets material kommer inte att ge en god verkan när de används på ett oprofessionellt sätt.
Vad bygger man ett energieffektivt hus av?
För att en byggnad ska betraktas som energieffektiv bör dess värmeisolering av väggar vara lägre än 0,2 W/(m²·K). En sådan värmeöverföringskoefficient kan uppnås tack vare lämpliga mur- och värmeisoleringsmaterial och de behöver inte vara extremt komplicerade tekniker. Endast deras parametrar, korrekt val och exakt användning är viktiga. Både enkel-, dubbel- och trippelskikts teknologi möjliggör att bygga ett hus i en energieffektiv standard. Enskiktsväggar, som ger möjlighet till ett snabbt husbyggande, uppfyller standardkrav när man använder varma lättbetongblock. De tillåter att bygga väggar med en värmeöverföringskoefficient U på 0,19 W/(m²·K) vid en väggtjocklek på 48 cm. Både mur- och isoleringsmaterialtyp påverkar skiktsväggarnas slutliga kvalitet. Lättbetongenssort 400 kommer att ha de bästa värmeisoleringsparametrarna om den är isolerad med polystyren med en tjocklek på 12 cm. Då når den skapande väggen värmeöverföringskoefficient U = 0,164 W/(m²·K). Tjocka väggar, uppförda av material som lättbetong, kännetecknas inte bara av god isolering utan också av värmeakkumulation, vilket är viktigt för modernt byggande.
Energiintyg
Nu för tiden får nybyggda byggnader ett så kallat energiintyg som anger EP-indikator för huset, vilket visar husets faktiska energibehov och därmed uppskattad levnadskostnad. Det ger också en uppfattning om objektets påverkan på den naturliga miljön. Till och med byggande ssom har påbörjats för länge sedan, som inte var avsedda att genomföra ett energieffektivt projekt, kan uppnå en högre standard än avsedd om man förbättrar ytterväggarnas värmeisolering.
Hälsosamt, varmt och hållbart Stenhus från lättbetong

Lättbetong är det varmaste materialet bland byggnadsmaterial. Det är också ett hållbart material. Lättbetongväggar förlorar inte sina egenskaper under åren. Byggnader byggda av lättbetong har stått i många år och klarar sig väldigt bra. Lättbetong är ett byggnadsmaterial med mycket gynnsamma parametrar. Tack vare den minskar kostnader för att inte bara bygga ett hus, som inte kräver speciella lösningar för att uppnå tillräcklig värmeisolering, utan också kostnader för byggnadsunderhåll. Tack vare detta är lättbetong ett byggmaterial som används i stor utsträckning vid byggnation av enfamiljshus.
How to cool an attic in summer
How to Reduce the Heat in the room?
We get a lot of such a questions from our customers. And we know how to solve this problem.
First of all we must understand why during the summer attic becomes hotter than rooms that are placed below it. That's because hot air always goes up. So hot air enters the house, goes up and stays there, because it stucks on the roof's insulation. Then sun is shining directly on the roof, heating it from one side, and at the same time warm air is collecting on the other side.
Second of all - roof windows. They look really great in the roof, give possibility of excellent view on the landscape or the sky, make interior light. But, glass absorbes the heat and gives it away to the room. Those are "weak points" of the roof. There's no insulaton there - like under the tiles, glass "sticks directly to the interior". Also Roof windows absorbs more heat than vertical ones. Therefore - the more roof windows, the hotter is inside the room. And by hotter - we mean really hot. Sometimes it is hard to get asleep in such a hot room. Even if the evening is much cooler than the day, attcic won't get cooled that quick.
How to prevent from summer heat?
Well, you can't stop physics, but we can trick it somehow :-)
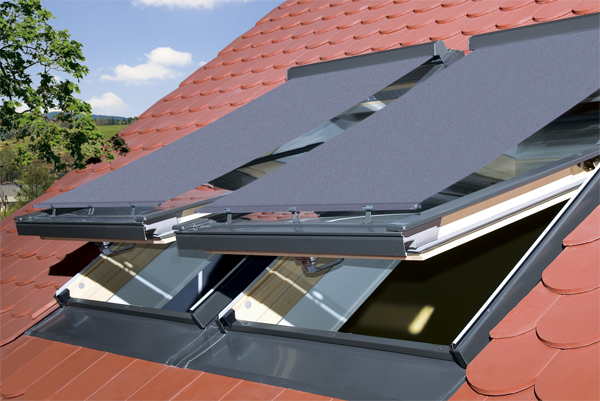
There is great product, that can help to reduce the temperature in the attic - awning blind for roof window. This is an excellent anti-heat solution. Awning blind supposed to be mounted outside the roof window. In that way, that it covers whole glass. Special mesh-fabric stops the sun, reflects the sunlight and doesn't allow it to get to the glass and through it. At the same time it doesn't limit the view. It gives little shade, but still you can see through it. Most common awning blind is a manual operated one - due to it's low cost and no problems with providing power supply. Very often an operation rod is included, for smooth manouvering. There are an extension rods available, if the standard one is too short, and window is to high. But here's also possibility of purchasing solar or electric awning blinds. It is a great solution for windows, that are placed high, beyond the hands' range. Operation by a remote control or programme opening and closing the blind at certain hours is possible then. They could be compatible with smart home system.
Many customers think, that regular blackout blind will handle problem of overheating. But unfortunately - no, it will not. Why? It's very simple - it is placed behind the glass, inside the room. That means, that sunlight will get to the glass easily and (perhaps in smaller amount than when there's no blind at all) through it.
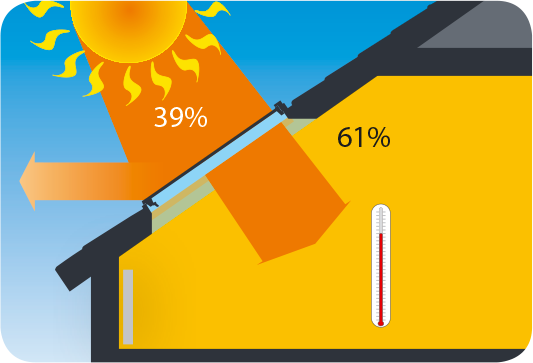
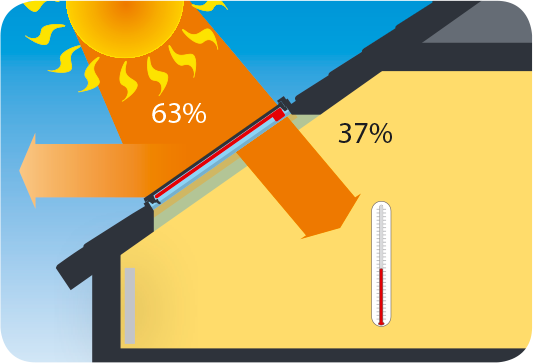
Below there's a comparison between no heat-protection, blackout blind and awning blind:
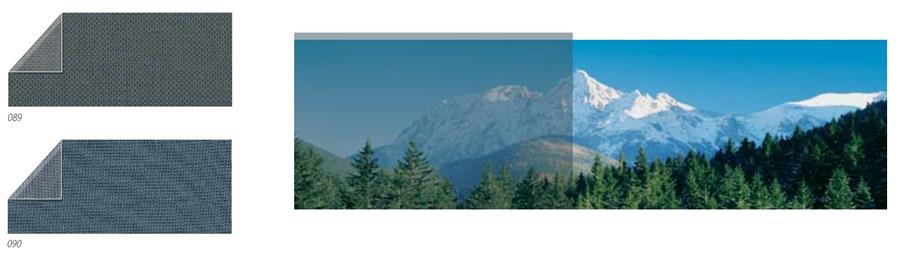
Roof window with no accessories g = 61% ( 0,61) according to EN 410
Roof window with blackount blind installed g = 37% (0,37) acording to EN 13363-1
Roof window with awning blind mounted
(depending on fabric used) g = 4-14% (0,04 − 0,14) according to EN 13363-1
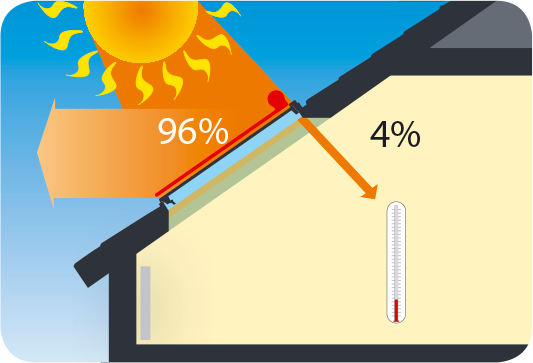
As you can see, even up to 96% of sunlight can be stopped thanks to the awning blind.
Most probably you will discover a wide range of fabrics, that are being used in blinds. Some of them may have relative fabric transparency = 10%, others 1% or different values. That means that some of the fabrics are denser than others. They are less, or more transparent, and allow to see more or less through them. At the same time, if fabric has 1% relative fabric transparency, it let less sunlight to the interior. So they are more efficient, but also more expensive at the same time.
According to our experience though even 10% transparency fabrics help to cool the air in the attic. Even up to few degrees- accoridng to our customers. So it is not necessary to buy more expensive products.
- relative fabric transparency = 10%
- relative fabric transparency = 1%

Also - what is important you can find many products, that are compatible with your window, even if they are not being produced by the same producer. E.eg OptiLight blinds from Kronmat (a subsidiary of FAKRO) fit to FAKRO windows and vice versa. Blinds from RoofLite (the same VKR group) fit to VELUX roof window. Of course all necessary information should be given in a product's description.
How to choose awning blind?
- First af all you must know what type of the window you have. It is very important, because each producer has his own external and internal accessories to roof windows. E.eg. Awning blind from FAKRO won't fit to VELUX window etc. That's because each producer's window has different thickness of the frame, different shape of the frame, and holes, where the scrubs should be screwed, can be placed in a different places.
- After that you must know what size of the window you have. Please note that while buying accessories to roof windows you should always choose the same size as window's size. Of course awning blind itself will be narrower than the window, but is correct, it has to cover only glass. The best way for checking that is to find a window's nameplate. It supposed to be placed on the sash. You can find serial number there, but also type and model of the window and it's size as well.
- Then please check if the blind, that you found in the store or online shop is dedicated to your type of window. It supposed to be written in a descriprion. If you have any doubts, you can always send a picture of the nameplate to the customers service of the following store, and seller should help you to choose proper product
- if the product is correct, please choose size corresponding to the windows' size
- then only installation is left
How to mount awning blind
Installation is very simple, you should follow the instruction, which is added to each blind, together with simple tools. Each producer place a ready holes in the windows, where blinds' screws should be screwed. Thanks to that you don't have to drill in the window's frame, and there's no threat that you will damage the frame and unseal the window. A blind's box should be mounted outside, at the top the window, hooks to which the awning will be hooked, should be placed at the bottom of the sash.
There is wide range of awnings on our website: awning blinds to FAKRO, VELUX, RoofLite, Skylight, OptiLight, and many others: DAKSTRA, DAKEA, SOLSTRO, LUXTRA, LUMINATEC windows. Filters placed on the top and on the left side of the website will allow you to choose awning blind compatible to your window.
How to choose a roof window
How to choose a roof window?
Most of us, when building a house or renovating an attic, have the question of what type of roof window is the right choice. Due to the wide range of market offers, it can be quite difficult to choose the right window. We have to take under consideration many factors, such as the manufacturer, the dimensions, the glass panes, the material and the accessories we want to equip our roof window with in order to enjoy and make easier their use.
There is a wide range of roof window sizes. Standard widths are 55 cm, 66 cm, 78 cm, 94 cm, 114 cm, 134 cm, while the typical heights of windows are 78 cm, 98 cm, 118 cm, 140 cm and 160 cm. Standard sizes of roof windows are therefore combinations of those two. The most popular sizes of roof windows are 78 × 140 cm and 78 × 118 cm. With such a width of the window, it is not necessary to removet window battens or adjust rafters.
It should be remembered that the dimension e.g. 78x140 cm is the total outer dimension of the window frame, not the dimension of the window itself, therefore the frame visible from the room is smaller then whole window. The glass surface is even smaller.
Which size to choose and what amount of roof windows will be perfect for the interior?
It is not an easy task. Correct lighting is determined by the ratio between the glass surface and the floor surface. The rule is that 1 m2 of glass surface reflects 8 m2 of floor space.
An example of calculating the number of windows needed to illuminate a room of 20 m²:
?= 20 (20 x 1): 8 = 2,5
This means that in order to illuminate a 20 m2 room, you must use windows with a glass surface of 2.5 m2.
Such a surface can be obtained with the use of:
- 4 windows 78 x 118 (depends on the manufacturer)
- 3 windows 78 x 140 (depends on the manufacturer)
- 2 windows 114 x 118 (depends on the manufacturer)
If you want to increase the amount of light that enters the room, it is worth to install several windows next to each other or above each other or several small windows in different parts of the roof. This provides better lighting than the installation of a one large window. Modular skylights looks really great on the roof, but it should be remembered, however, that the number and size of roof windows can not be exaggerated. Roof windows emit more heat than the walls. Glass absorbs a heat and gives it further to the room. Therefore in the summer it can be realy hot in the attic. Of course there are products, which prevent from summer heat - awning blinds. This exterior product can reduce temperature in the room even up to few degrees. More about it in a separate post.
How to install a roof window and how big should the window opening be?
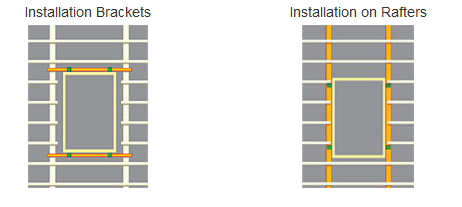
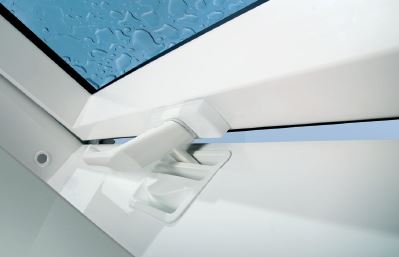
Most roof windows are installed on roof battens. They are mounted with brackets placed at the top and the bottom of the window frame. There is a possibility of installing the window on the rafters - also thanks to mounting brackets, placed on the sides of the window.
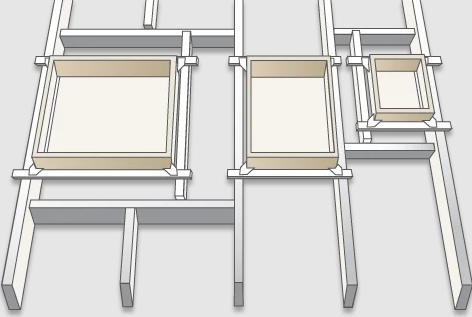
First there should be window opening made in the roof.
The width of the roof window always should be chosen that way, that it is not necessary to adjust the rafters - if possible of course.
A window opening should be a little wider, up to 5 cm, than the roof window themselve e.g. distance between the rafters, for skylights 78 cm, is 83 cm.
The length of the skylight depends on the roof pitch. Usually the lower edge of the window should be mounted at a height of about 100-120 cm above the floor surface and the upper edge of the window - 180-200 cm. A window installed in this way ensures fantastic view, both when looking standing and sitting. To meet the requirements for comfortable maneuvering and a good view, the ground rule is: the smaller the roof pitch, the longer the skylight.
If there's an open hole in the roof and the roof window does not fit exactly between the rafters or battens, then exchange or adjustment should be done.
If the skylight is wider, it is necessary to cut out a part of one rafter. Two adjacent rafters should not be cut out at the same time, because this would weaken the roof structure too much. After cutting out the rafter, below and above the skylight, spare beam should be installed to maintain stability. They transfer the loads from the cut rafter to the adjacent rafter and thus reduce a burden of the weaker part of the roof.
What’s the standard window installation height from the floor?
If you are thinking about how high you should install a skylight to ensure the comfort while using, imagine a window 78 × 160 with a handle at the top that is installed at 1.30 m. The handle will probably be out of reach for everyone. It is assumed that roof windows with a handle at the bottom are supposed to be installed at a height of 130-150 cm, and those with a handle at the top - at a hight of 80-130 cm. The roof window should be mounted at a height that allows a standing person to look straight ahead, not just upwards.
When choosing windows, also check the height of a knee wall and the roof pitch. The higher the knee wall, the higher the bottom edge of the skylight. In such a case, it is worth to install a vertical window / facade window that can be mounted directly under the skylight. It is optimal to place the roof window so that the lower edge is at a height of about 120 cm above the floor. The handle, which is located at the bottom of the frame, is within reach and the skylight perfectly fulfills its main functions. Such a montage also allows you to comfortably place furniture under the roof window and you do not have to bend down when standing at the window.
Summary:
- Roof windows illuminate the attic more efficiently than vertical windows.
- It is worth taking the time to carefully plan and choose roof windows.
- The best result is achieved by using more roof windows that are located in different places on the roof than the windows that are mounted modular.
- The higher the windiw is mounted, the better the room will be lightened.
- Large roof windows provide easy light spreading in the room and ensure visual contact with the surroundings .
- Thanks to the appropriate choice and montage of roof windows and without significantly increasing costs, you can get efficient lighting with sunlight, good ventilation, thermal and acoustic comfort.
- To increase comfort in the attic, it is worth equipping our skylights with accessories, for example: awnings or blinds.
TV wall: Read here how you can transform your TV wall to an absolute unique installation.

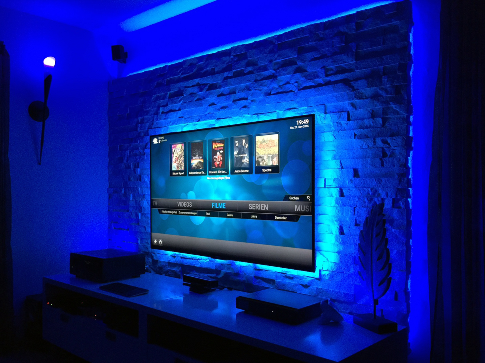
We are very pleased to present with step-by-step instructions how to easily construct the super TV wall. We would like to thank our customer very much, who, because he found very little information on the Internet, he decided to create the visual documentation of his construction project, and also gave a lot of information on the procedure and explained what was done and why. The result is a wall made of bricks that is more than just impressive. Please read our customer's documentation now and get inspired for your own projects. You also have the option of leaving a comment below the text or share your construction's realization. We are very curious how do your projects look like.
Idea, plan, tiles choice
I planned to hang my TV on the wall for a long time. What kept me from doing it? I didn't want to see any supply cables. Or a cable duct - like the many people mount, was out of the question for me.
So I quickly got an idea to build a "wall in front of the wall". But how should it be made? Shall I paint it? Put a wallpaper? But I really didn't want that. I liked stones - I thought.
So after a long search I found this company, which among other things offers a wide range of different bricks, stones and brick slips.
Of course, I had a lot of questions that were answered in a very friendly and competent manner.
So when I ordered the stuff, I still had a bad feeling about this. If the transport works, the goods arrive safely, etc. But what if not? Finally everything arrived in top condition, secured properly. After searching the Internet a lot at the beginning of the project and not finding too much, I decided to document the whole thing a little
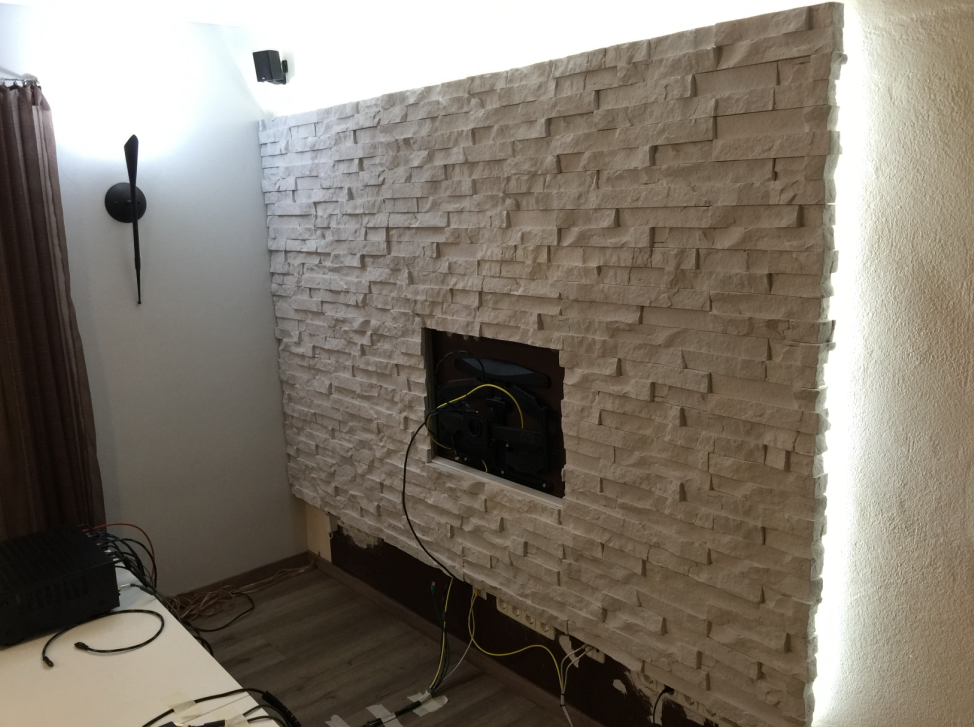
My wall was made of YTONG blocks
Stone I chose: Cairo moonlight.
Montage
I mounted 18 mm OSB boards with tongue and groove onto profiles screwed to the YTONG wall. As a TV holder I took an extendable holder, because thanks to it, it would be possibile to adjust the depth later once the stones are glued. Thanks to that TV sits flat and very close to the wall. I screwed the holder with special YTONG anchors from Fischer. It will hold a 65 'TV later.
The nice thing about the holder: If you have to work on the cables later, you can pull everything off very nicely without removing the TV.
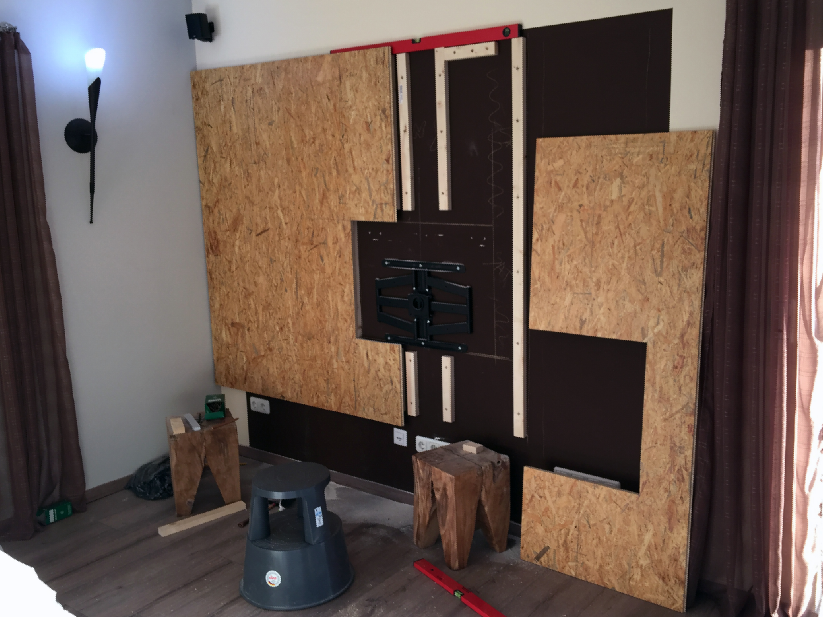
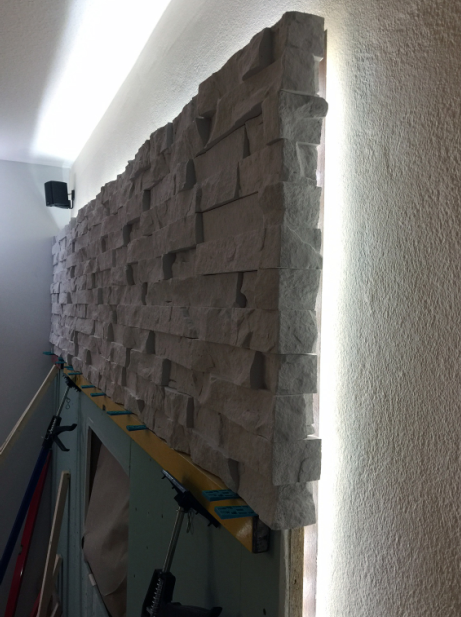
When the boards were screwed together, I primed the surface 3 times with a deep primer. The plates are mounted on at the top and on the right little higher than profiles so that they outstand slightly. Thanks to that I installed Philips Hue Stripes + LEDs.
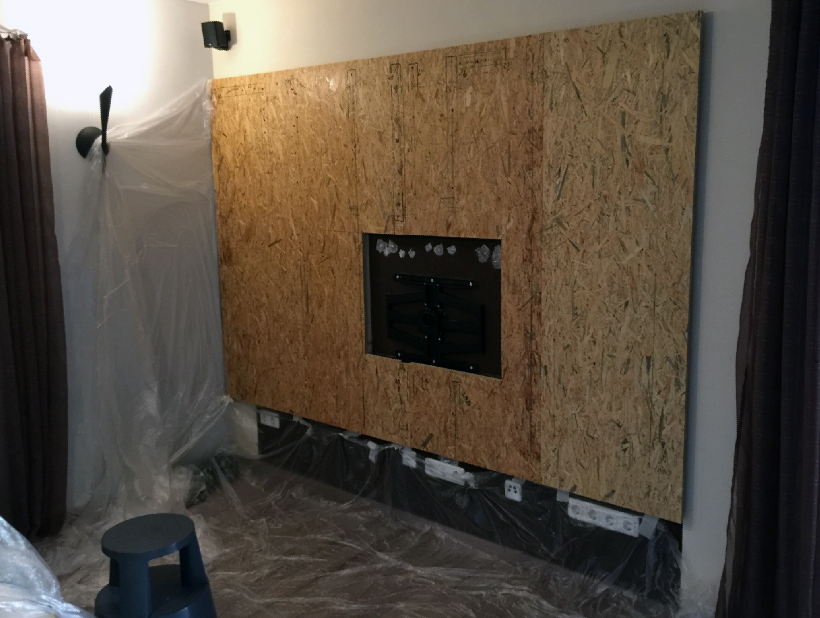
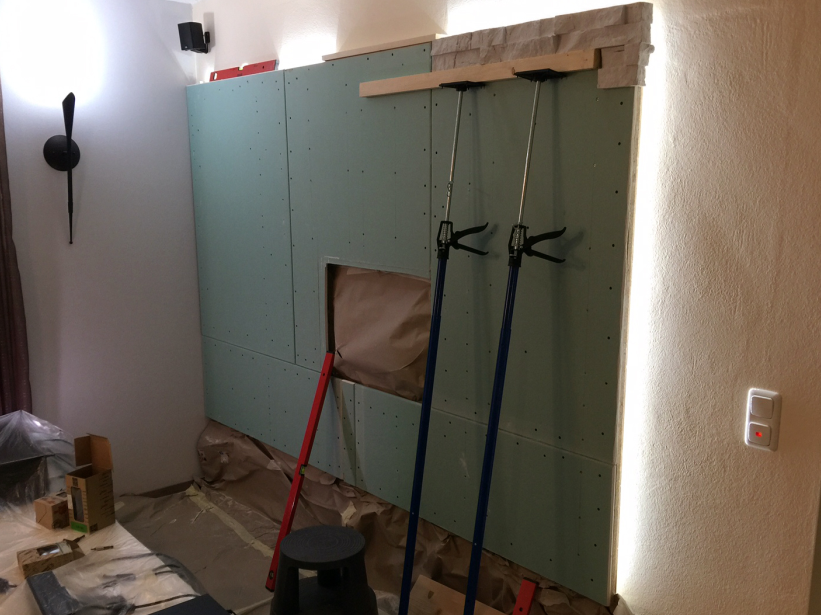
I mounted GKB boards on OSB boards.
Why? That's very simple, on OSB baords gypsum tiles won't hold so easily as on plasterboards boards.
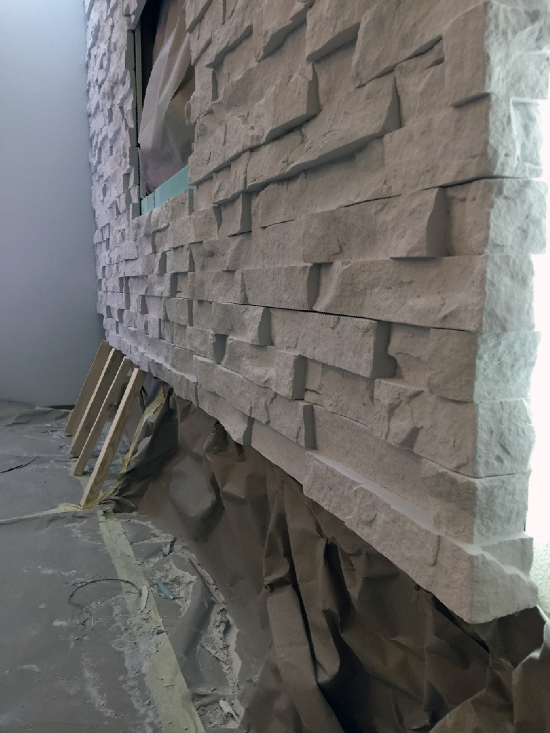
For sure you are wondering why I got started from the top.
Also very simple: The shape of those tiles is not regular and I was afraid, that when I will start from the bottom, top layer would be not perfect (because most probably I would have to cut the tiles in half to adjust them to the boards).
That's why I started from the top.
To prevent tiles from sliding down, I worked with supports. It turned out that it wasn't necessary because the glue dried very quickly. Well, better safe than sorry. ;-)
Starting from the top also had an advantage while gluing. If a little glue spilled nothing stays on the stones.
I cut the stones with a standard foxtail hand saw.
The cuts have to be right-angled.
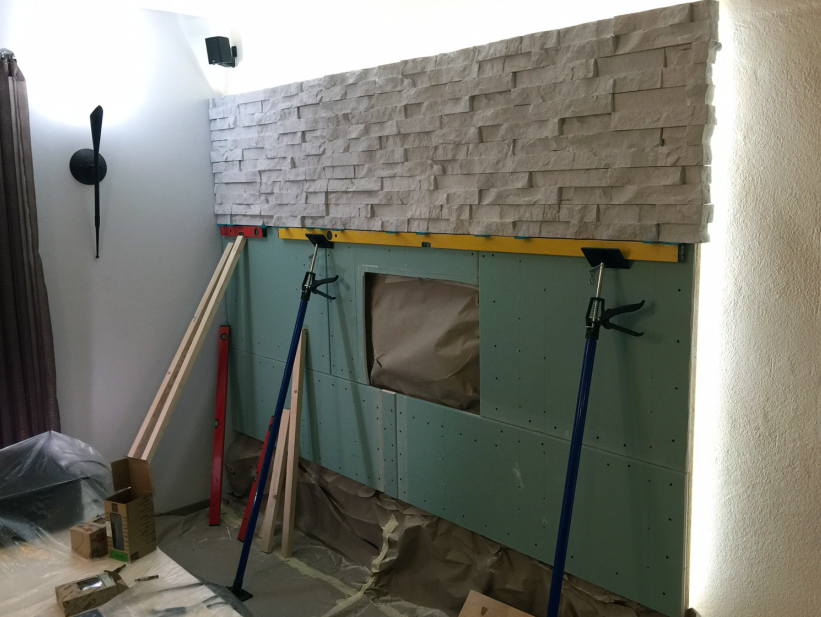
I had to cut the corners edges. They had to be cut exactly in such a way that the edge of the OSB board and plasterboard was covered.
I didn't mount them right up to the wall, but left a gap. That was intentionally. Now light from the LED tape comes through.
I mounted LED tape in a way that allows me replacing it in the future.
At the bottom I supported the last row with leftover pieces of wood.
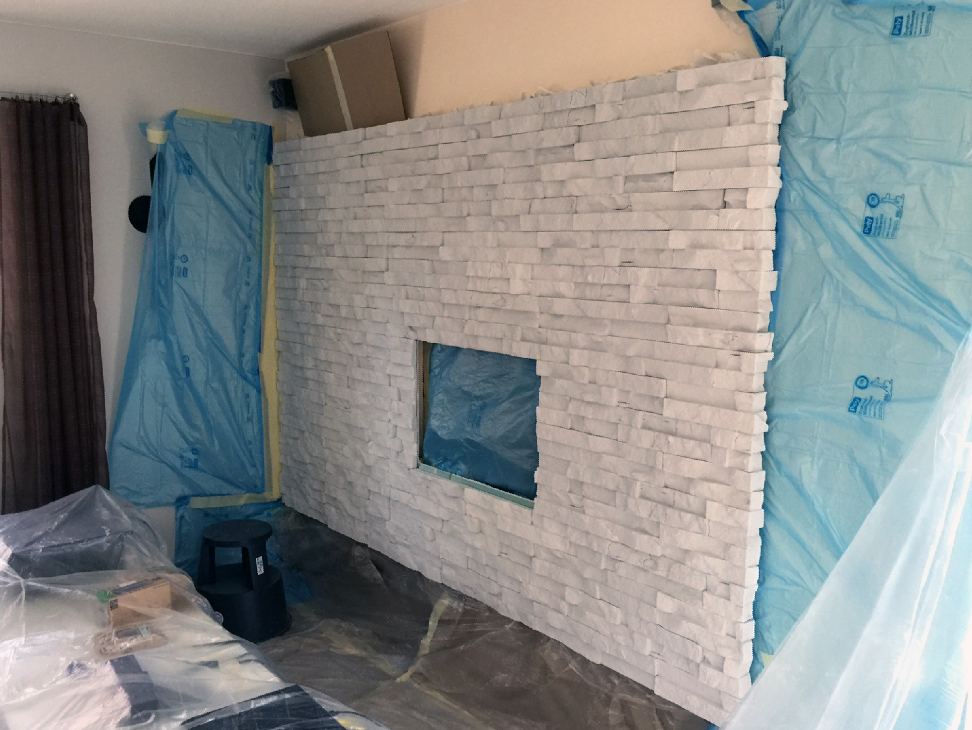
Then I primed the tiles to secure them from getting dusty later.
You must be careful there - secure the walls around, so that primer won't make a stains everywhere.
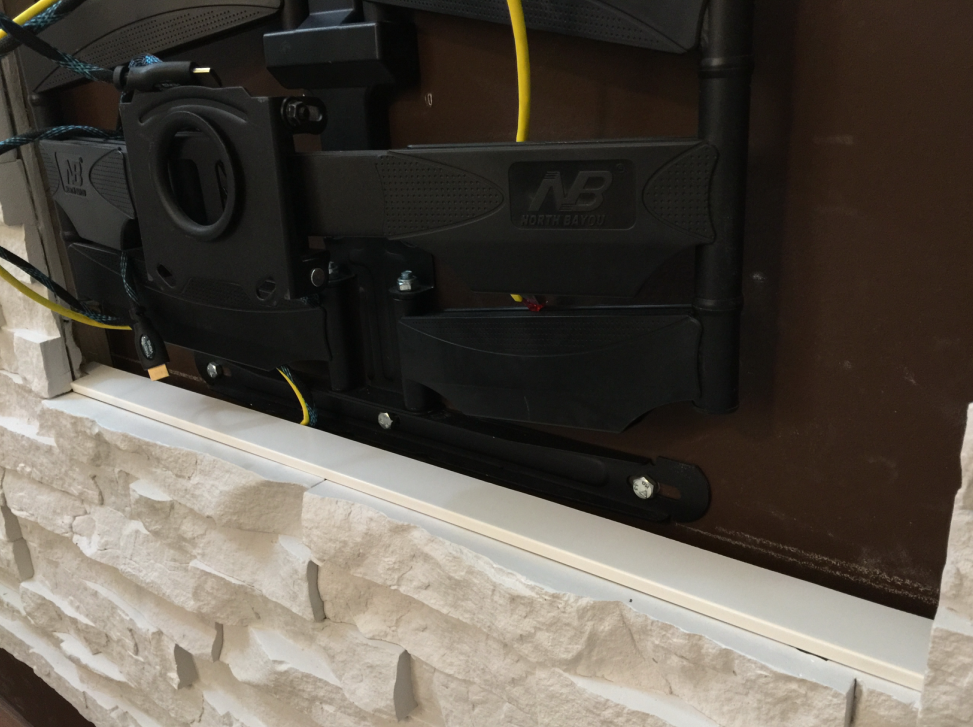
In bottom edge of the holder, I put a cable duct cover to mask the edges where you can see OSB and plasterboard.
You can't see it later after TV montage, but I prefer that way ;-)
Then it was time to lay the cables.
After taking this picture I put more sockets under the wall and repainted the lower edge.
Then I installed the 65'' TV and attached a DIY Ambilight to it, which is controlled via Raspberry.
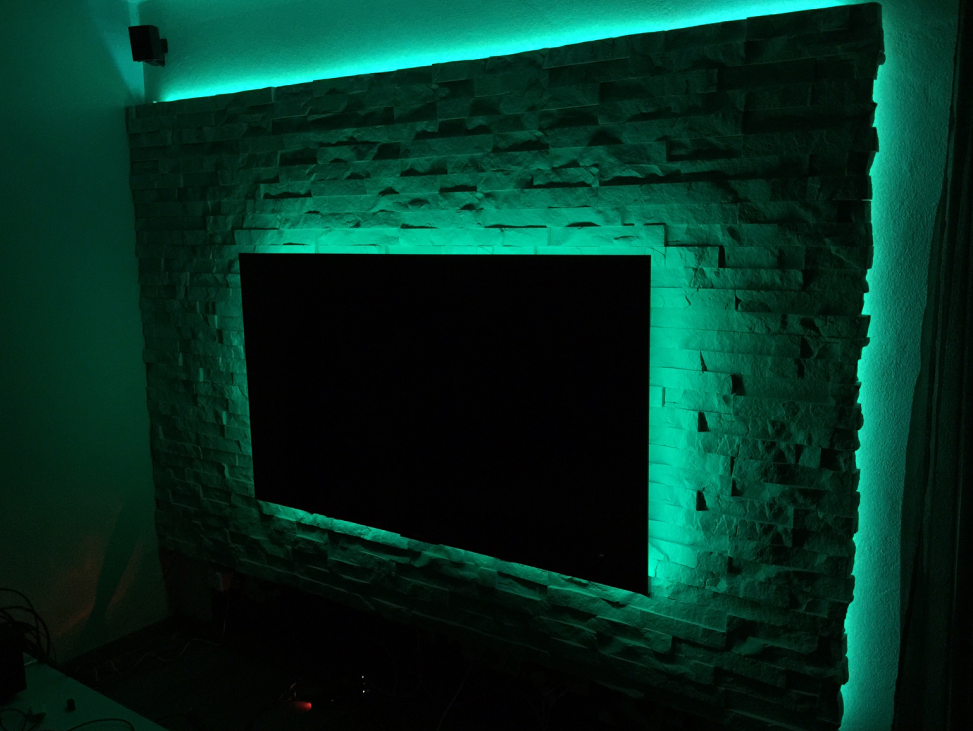
Then I put a furnitures back. Tiles on the wall look perfect in indirect light.

To sum up:
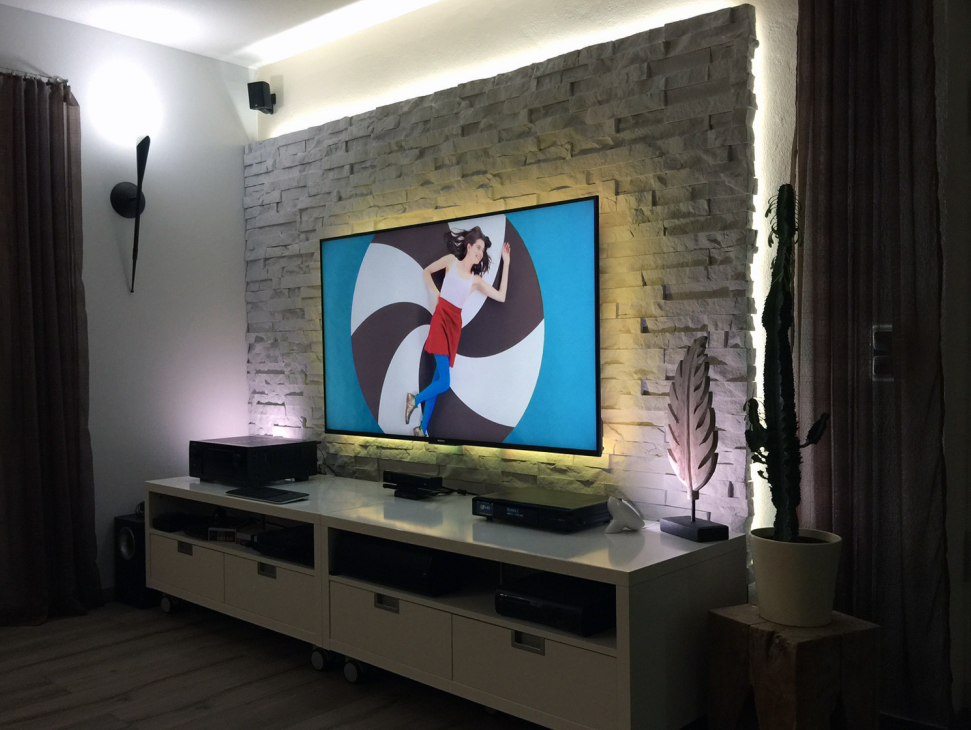
Work with those tiles is very easy. However, there is also a lot of dust. Therefore, as written above, I sawed tiles by hand, which is really quick. I glued the stone almost perfect. A few spots, where joints are not even could not be avoided totally. But it is not noticeable.
The final result on the Foto doesn't look as good as it really is. It looks just great!
If you have any further questions, please do not hesitate to contact me directly. I will answer you as soon as possible.
Greetings from the North
F.Mollenhauer ([email protected])
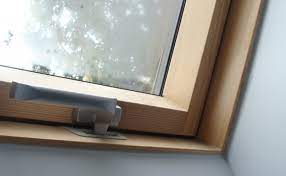
Wooden or PVC roof window?
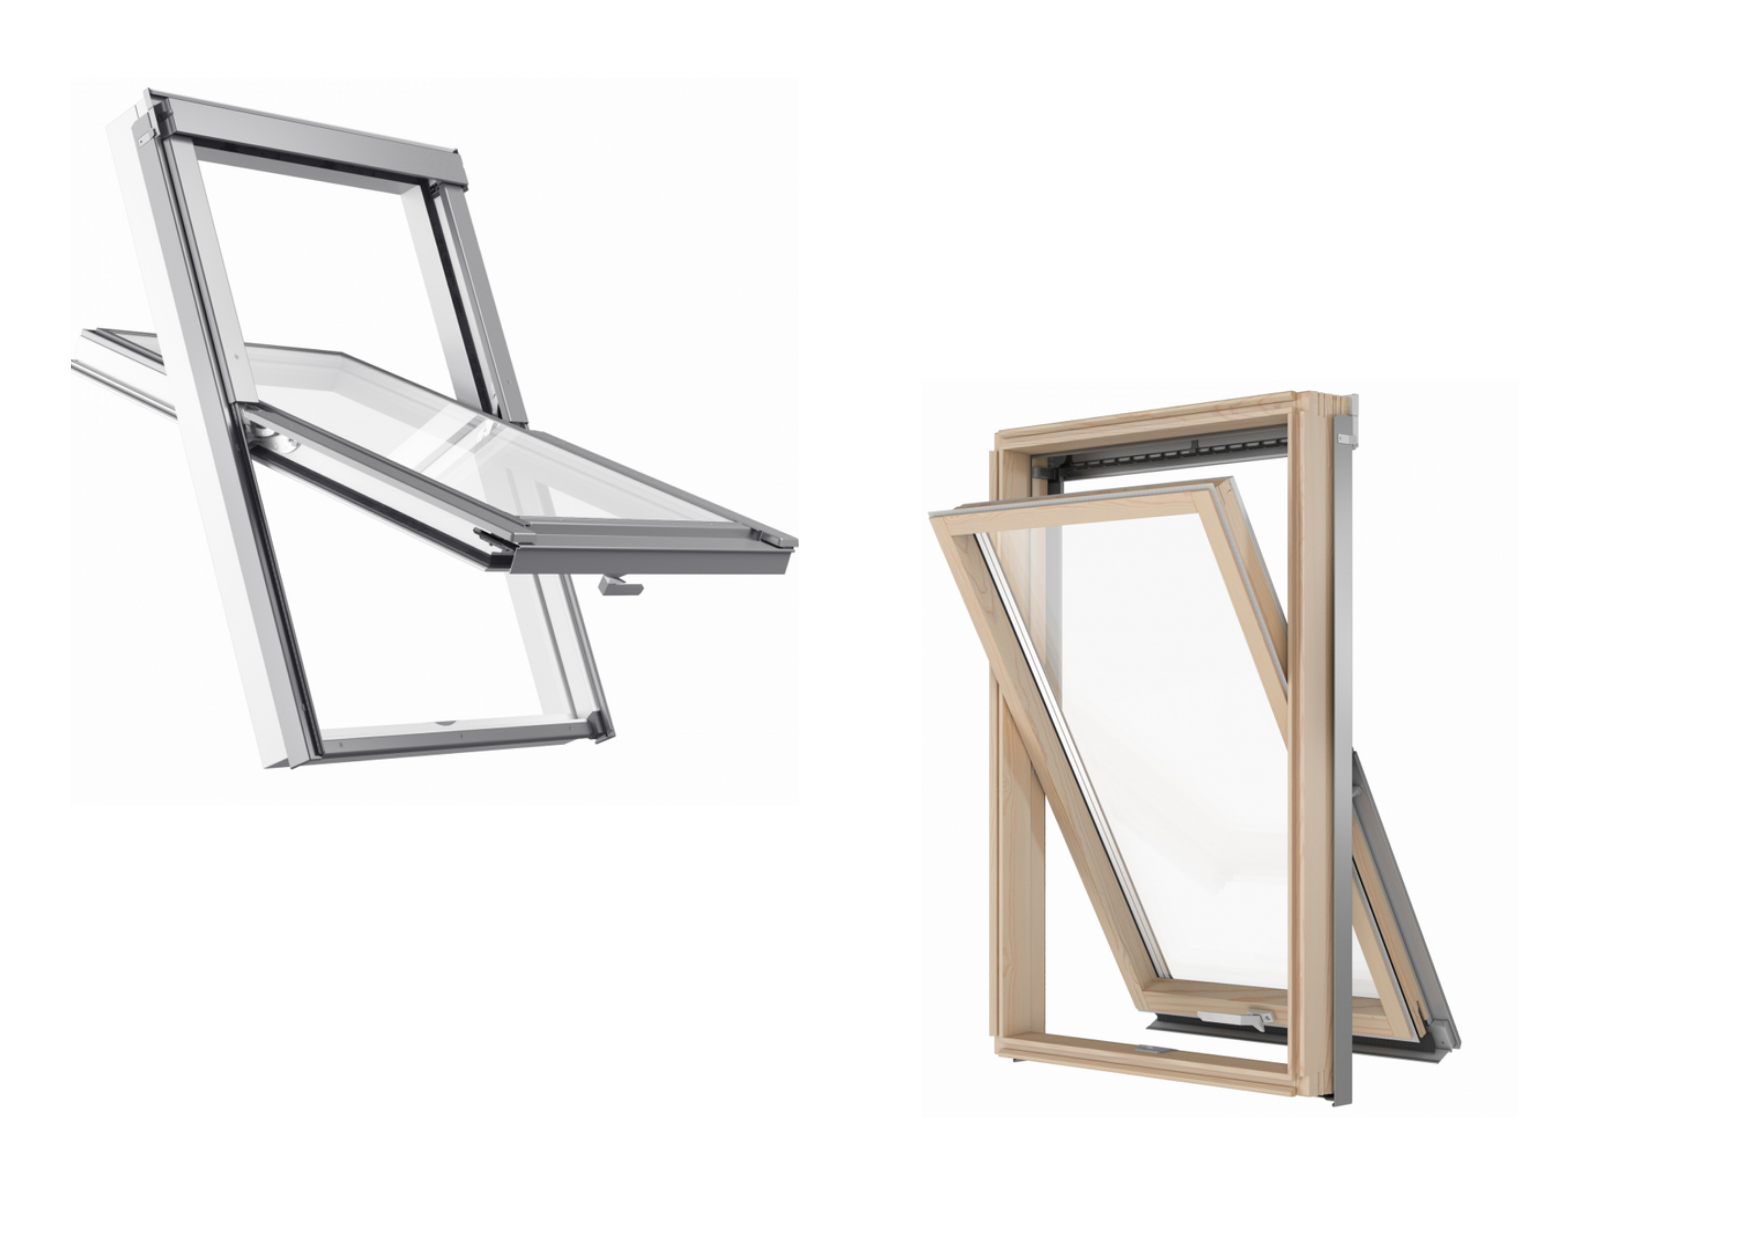
Those who want to install or replace a roof window today are faced with a very wide range of products. Do you prefer a classic pivot-hung window, or a top-hung window to have a better view? Which glass is better (with better U-values, sound insulation, burglary proof)? In addition, there is a large range of accessories for mounting and a large number of different manufacturers of those accessories.
VELUX vs SkyLight and OptiLight. Quality comparison.
A lot of customers questions mainly concern SkyLight roof windows: Are they comparable to VELUX? VELUX is still a synonym of the highest quality windows, which is also reflected in their price. Is it right to judge only according to this criterion? This clarifies that SkyLight obviously cannot have the same quality. But, is it really so? How should the two cheap brands of roof windows made of plastic - SkyLight and OptiLight - be judged on the basis of quality? To do this, you need to get to know a manufacturer.
Building with SOLBET aerated concrete from Poland

The largest lightweight concrete producer in Europe
SOLBET is the largest manufacturer of high quality aerated concrete in Poland. The company has been manufacturing aerated concrete for over 70 years. Today, SOLBET has seven production spots where aerated concrete is manufactured, two for construction chemicals and one for reinforced aerated concrete elements, and two where autoclave-treated aerated concrete is manufactured. With a daily capacity of over 2300 cubic meters, the production facility in Solec Kujawski is the largest production facility for aerated concrete in all of Europe. This modern company is the European market leader in the production of lightweight concrete blocks .

The company's proven strategy ensures optimization of production costs, which influences on the pricing policy. This means that SOLBET can offer high quality products at an reasonable price. The excellent quality of SOLBET's products, which is the result of more than 70 years of experience, enables the company to achieve many successes in the demanding European markets. The quality of SOLBET's materials and the technical level of the factories fully correspond to the level of other European manufacturers. The SOLBET brand is present in many European markets. SOLBET concrete blocks from Poland are now sold in Germany, Denmark, Sweden, Norway, Belgium, Russia, Slovakia, the Czech Republic, Hungary, Lithuania, Latvia and Ukraine.
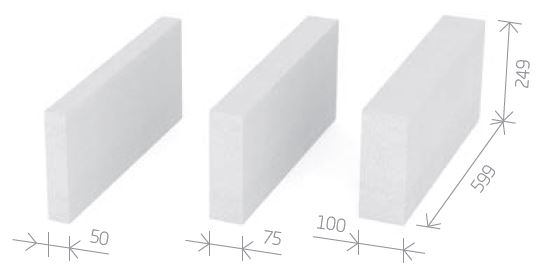
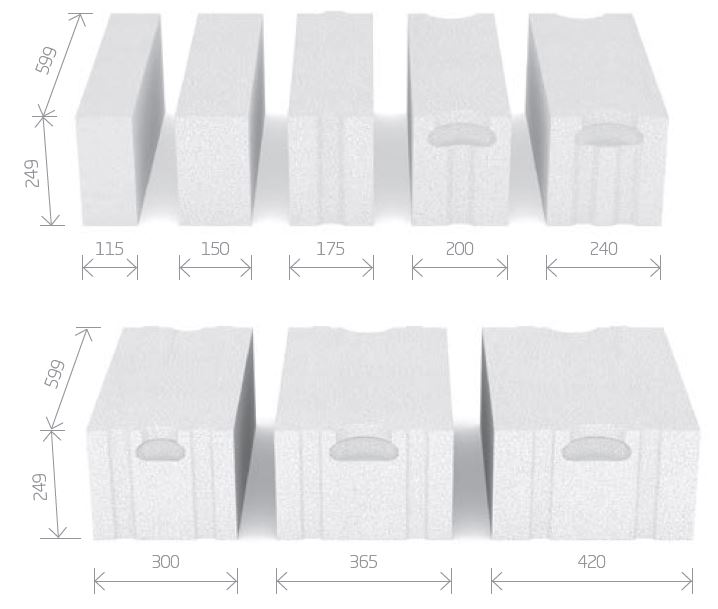
Lightweight concrete blocks are available in the following sizes:
- block PP2-040, 175 mm, 240 mm, 300 mm, 365 mm, 420 mm
- block PP2-050, 50 mm, 75 mm, 100 mm, 150 mm, 200 mm
- block PP4-060, 115 mm, 175 mm, 240 mm, 300 mm, 365 mm
Buildings of SOLBET's aerated concrete
Various types of buildngs can be built from SOLBET aerated concrete: from single-family houses to commercial buildings and industrial buildings. Blocks from SOLBET can be used for the construction of single- and multi-layers on both load-bearing and partition walls. The low dimensional tolerances for the flat blocks mean that they can be masonry with thin joint glue. Buildings made of SOLBET products are solid, ecological and modern.
Is aerated concrete an ecological material?
The company SOLBET works in a closed ecological cycle: starting with the production up to the waste management. The manufacturer continues to invest in modern, effective and environmentally friendly solutions. Two wind turbines, the total output which covers the energy needs of the entire company on windy days, are the company's contribution to the pro-environmental attitude. Only natural raw materials (limestone, quartz sand, water) are used to produce the aerated concrete. The recycling of post-productive waste protects natural raw resources. The low weight of the blocks saves energy during transport. The products are environment friendly and do not emit any harmful substances.
Energy saving
Building with SOLBET's products allows to save energy and heating costs. The special properties of lightweight concrete protect the building's interior from both the summer heat and the winter cold. Thanks to the excellent thermal insulation value, even extreme outdoor temperatures never enter the living space. In this way, the aerated concrete of SOLBET ensures a high standard of living and guarantees that valuable energy is saved. This is confirmed by the well-known test facilities and institutes for material control in Germany such as MP Berlin. This institute carried out the certification tests for the SOLBET materials and confirmed the value of thermal conductivity λ = 0.10 [W / mk].
| Class | Thermal conductivity λ | U-value(W/m²K) | |||||||||||||||||||||
| Size [mm] | |||||||||||||||||||||||
| 50 | 75 | 100 | 115 | 150 | 175 | 200 | 240 | 300 | 365 | 420 | |||||||||||||
| PP2-0,40 | 0,10 W/(m·K) | - | - | - | - | 0,53 | - | 0,39 | 0,32 | 0,27 | 0,23 | ||||||||||||
| PP2-0,50 | 0,14 W/(m·K) | 1,90 | 1,42 | 1,14 | - | 0,81 | - | 0,63 | - | - | - | - | |||||||||||
| PP4-0,60 | 0,16 W/(m·K) | - | - | 1,13 | - | 0,80 | - | 0,60 | 0,49 | 0,41 | - | ||||||||||||
Solid and stabile construction - solid houses of lightweight concrete
The aerated concrete SOLBET guarantees suitable stability of the buildings without affecting the elasticity of the architectural project. The high compressive strength of 2.75 N / mm² makes this material suitable for building bearing and non-bearing walls in all kinds of buildings with different construction and use (also multi-storey buildings). Because the SOLBET blocks are also relatively light, your house will be built quickly and efficiently.
| Class | Compressive strength | Density |
| PP2-0,40 | 2,8 N/mm² | 375 (±25) kg/m³ |
| PP2-0,50 | 2,8 N/mm² | 475 (±25) kg/m³ |
| PP4-0,60 | 5,2 N/mm² | 575 (±25) kg/m³ |
An optimal indoor microclimate
The unique structure of the SOLBET aerated concrete blocks guarantees a healthy and pleasant indoor climate. The low thermal conductivity of the building material makes it possible to achieve a constant temperature inside despite external temperature changes. The porosity of lightweight concrete blocks also ensures that excess moisture is absorbed and collected from the rooms and then released again if the room air is too dry. The uniform porosity ensures that the heat conduction is the same in all directions and that the building material is open to diffusion, ie. breathe.
Acoustic insulation
The sound-insulating properties of building material depend on its own weight. In the case of walls made of aerated concrete, it was found that, due to the porous structure of the aerated concrete, the sound level in relation to its sound-insulating properties is 2 to 3 dB higher than the sound acoustics of partition walls and materials with the same dead weight.
The homogeneous distribution of the air pores in the building material ensures uniform sound insulation in all directions. The walls made of aerated concrete were examined for sound-absorbing behavior in the test institute for structural engineering and received the display value for sound insulation corrected by 2 dB and display value for acoustic insulation RA1R and RA2R.
| Value RA1R and RA2R [dB] depending on the wall thickness [mm] | |||||||||||||||||||||||||||
| RA1R - for inner walls | RA2R - for exterior walls | ||||||||||||||||||||||||||
| Type of block | 50 | 75 | 100 | 175 | 240 | 300 | 365 | 420 | 50 | 75 | 100 | 175 | 240 | 300 | 365 | 420 | |||||||||||
| PP2-0,40 | - | - | 33 | 41 | 41 | 44 | 46 | 47 | - | - | 32 | 35 | 38 | 40 | 42 | 44 | |||||||||||
| PP2-0,50 | - | 31 | 35 | 41 | 44 | 46 | 48 | 49 | - | 30 | 33 | 37 | 40 | 43 | 45 | 45 | |||||||||||
| PP4-0,60 | - | 33 | 37 | 43 | 46 | 48 | 50 | 51 | - | 32 | 34 | 39 | 42 | 45 | 47 | 47 | |||||||||||
Is lightweight concrete fire resistant?
Aerated concrete from SOLBET is made of non-combustible material. Solbet blocks won't be affected by a fire and thus form a barrier against the spread of fire. In the same way, lightweight concrete from SOLBET emits no pollutants or toxic fumes. A partition wall with a thickness of 11.5 cm also has fire class EI 120. The higher fire class REI 240 can be achieved with a wall thickness of 17.5 cm. SOLBET materials guarantee the highest level of safety, even without additional fire protection systems. The fire resistance tests for SOLBET products, which are carried out regularly in the test laboratories, confirm the high level of safety without exception. Because aerated concrete is extremely resistant to high temperatures, the chamber where fire tests are performed on other building materials is built of aerated concrete.
| Size [mm] |
EI | REI | ||||||||||
| walls without plaster | walls with plaster | without plaster | with plaster | |||||||||
| Utilization factor | Utilization factor | |||||||||||
| α ≤ 1 | α ≤ 0,6 | α ≤ 1 | α ≤ 0,6 | |||||||||
| lower limit value (LG) | upper limit value (UG) | LG | UG | LG | UG | LG | UG | LG | UG | LG | UG | |
| 60 | EI 60 | EI 90 | EI 90 | EI 120 | - | - | ||||||
| 80 | EI 90 | EI 180 | EI 120 | EI 180 | - | - | ||||||
| 100 | EI 90 | EI 240 | EI 180 | EI 240 | REI 30 | REI 120 | REI 30 | REI 120 | REI 30 | REI 120 | REI 30 | REI 180 |
| 120 | EI 240 | REI 60 | REI 120 | REI 90 | REI 120 | REI 90 | REI 120 | REI 120 | ||||
| 180 | EI 240 | REI 90 | REI 240 | REI 180 | REI 240 | REI 90 | REI 240 | REI 180 | ||||
| 240 | EI 240 | REI 180 | REI 240 | REI 240 | REI 180 | REI 240 | REI 240 | |||||
| 300 | EI 240 | REI 180 | REI 240 | REI 240 | REI 240 | |||||||
| 360 | EI 240 | REI 240 | ||||||||||
| 420 | EI 240 | REI 240 | ||||||||||
Highest resistance to atmospheric factors
SOLBET's lightweight concrete is resistant to many atmospheric conditions. The chemical composition of aerated concrete prevents the development of dangerous microorganisms. Due to the strongly alkaline reaction of the material and the rapid attenuation, no bacteria, mold or fungi develop on the aerated concrete surface.
All types of walls
Each SOLBET product is manufactured with very high dimensional accuracy. The blocks and u-blocks are offered in many dimensions. This means that many types of walls can be raised with SOLBETl. The simple processing of the aerated concrete elements means that there are no architectural boundaries. With the lightweight concrete elements, you can build from the basement to the roof in a flexible way. With those blocks even arched partitions, efficient fireplaces or a bathtub coating can be built.
What is the cost of lightweight concrete blocks?
Due to the low weight and the relatively large dimensions of the building blocks of SOLBET, the construction work is simple and efficient. By using lightweight concrete, the construction time can be significantly shortened, which helps to reduce your costs. A block of aerated concrete can replace several bricks. Thanks to the profiled side surfaces of the blocks, it is not necessary to fill the horizontal joints with thin-joint glue, which speeds up the construction work and reduces the purchase costs of thin-joint joints. Another advantage of lightweight concrete blocks is their high dimensional accuracy, which allows them to be built with a thin layer of mortar. Building walls is like a child's play - the individual block parts can be easily cut to the desired size and their construction only requires the use of simple tools. The best proof is the construction of the International Fund "Habitafor Humanity", which was built from SOLBET's materials and by the volunteers.
The highest quality
Many years of experience, the trained employees, the modern production system and the high level of ambition help to manufacture SOLBET products with the highest possible quality. The quality management system has been introduced in SOLBET factories. SOLBET products received ISO 9000 and OHSAS 1800. Every block that is manufactured, before it leaves the production facility and reaches the customer, must meet the requirements of the strict quality control system.
Window condensation
Few words about condensation
A common problem with windows is so called "sweating window", it mainly occurs on roof windows. Because they are mounted on the roof, they are particularly exposed to environmental impacts such as rain, hail and temperature changes. How it occurs? When a hot, humid air hits the cold window, it cools down and some of the moisture condenses on the window (the transition from steam to water is called condensation). The better the insulation in the attic, the higher the condensation level. Despite of the water vapor diffusion in the insulation layer, water vapor stays in the room / attic. Both new buildings and old but well-renovated buildings are particularly tight nowadays, which is of course good for the energy balance, but not perfect for the indoor climate. This means that moisture generated inside cannot escape.
A small amount of water vapor, which mainly settles on the glass and the surrounding elements, can be considered as a normal process. However, if you find that your window is filled with water vapor between the windows, it means that the window has lost its heat-insulating properties and must be replaced.
Especially during the winter season, you can see that small drops of water form not only on the window but also on the window frame. Condensation occurs mainly after activities that cause a high moisture level, e.g. cooking, washing or showering. This means that humidity plays an important role in counteracting condensation. It is known that water always arises where the warm, humid air meets a cold surface. As a result of the cooling, the air can retain less moisture, so that an excess is condensed and in the form of water droplets appears on the cold surface. The room temperature therefore plays an important role, as does the temperature difference between inside and outside. If the temperature differences are higher than 20 ° C and the humidity is above 60%, condensation occurs. Condensation occurs mainly during the colder season when the temperature differences between day and night are extremely high. When the air is heated, the condensation evaporates. If there are other factors, such as a lot of snow on the windows, in extreme situations it can even lead to condensation freezing on the inside of the frame and damaging the structure, especially wooden windows.
In general, condensate is not harmful. There are two areas where condensation can have a negative impact though:
- On the one hand, it stays on window's elements - wood is of course particularly sensitive here - but also the cladding around the window, which is often made of plasterboard. Moisture cam create the mold on such surfaces and destroy them.
- The second area is the health of the inhabitants. Living in a humid environment can lead to coughing and shortness of breath. And once mold occurs, there are other negative effects on health e.g. allergic reaction.
How to stop condensation on windows?:
- Short-term ventilation - the windows should be fully opened 3-5 times every day for 10-15 minutes at a time. If there is a possibility to do a draft, it is even better. To do this, simultaneously open two roof winows that are placed opposite each other. In this way, you can quickly achieve an air exchange with minimal heat loss.
- Windows with natural ventilation - this allows a constant air exchange between the damp inside with fresh outdoor air even when the window is closed.
- Keep the room temperature as constant as possible throughout the day. Recommended temperatures: bedroom 18 ° C, children's room, bathroom 23 ° C, basement - not less than 15 ° C. The humidity should be between 40-60% in the apartment and up to 70% in the bathroom.
- Regularly remove condensate / water vapour to prevent mold.
- Location of radiators. It is recommended to install a radiator under each window. There should be a distance of at least 10 cm between the window sill and the radiator to ensure the hot air circulation. In this way, the extreme cooling of the window glass can be avoided and the risk of water vapour occurance reduced. In addition, the rising hot air absorbs already accumulated condensation and ensures faster drying.
- Avoid humidifiers and water vaporizers on radiators if possible.
- When cooking and showering, open the windows so that the moisture can be released immediately. At the same time, keep the interior doors closed so that moisture cannot spread to other rooms.
- Do not dry laundry in the living room to not to increase the humidity.
- Particular attention should be paid to the "sources of moisture" in the room, especially in winter. This means that temporary activities such as cooking or showering, high presence in the home also increase the humidity, as well as plants or pets. So it is better to divide such sources, especially in winter.
Comments
No posts found